white Marble ledgestone tile bathroom wall
Sep 21, 2025
Choosing Bianco Statuario Marble Ledgestone is an excellent way to create a luxurious and timeless feature wall in your bathroom. However, it's a natural stone that requires more consideration than ceramic or porcelain tile. Here's a comprehensive breakdown of what you need to learn before buying, during installation, and for long-term maintenance.

Summary: The Quick Answer (The Reality Check)
It's Expensive: High-quality marble tile is a premium product.
It's High-Maintenance: Marble is soft, porous, and susceptible to etching (dull spots from acids) and staining.
Installation is Critical: It must be installed by a professional with specific experience in natural stone, especially in wet areas.
Embrace the Character: Natural variations, fissures, and veining are not defects; they are the beauty of the stone. It will not look like uniform porcelain.
1. Before You Buy: Selection & Purchasing
This is the most important stage. Getting the right product and enough of it will prevent headaches later.
A. Understand the Material: Real Marble vs. Look-Alikes
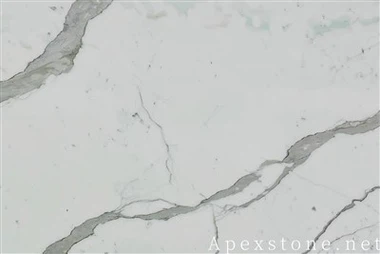
Bianco Statuario Marble: This is a specific, high-end Italian marble known for its white background and bold, dramatic gray veining. It is a calcite-based marble, which means it is susceptible to etching.
Porcelain or Quartz Look-Alikes: Many companies make porcelain tiles that mimic this look. Strongly consider these alternatives. They are:
More durable: Highly resistant to scratching and etching.
Less porous: Much more resistant to staining and mildew.
Often less expensive: Both in material and installation cost.
Easier to maintain: Require no special sealants.
B. Quality and Grading:
Marble is graded (e.g., Grade A, B, C). Higher grades have fewer natural imperfections, more consistent color, and tighter veining. For a feature wall, you might be able to use a grade with more character, but inspect the slabs.
Ledgestone Specifics: This means the tiles are stacked in a random, dry-stack pattern. Check for consistency in thickness and the "reveal" (how much each tile protrudes). Inconsistent pieces are harder to install.
C. Ordering:
Buy a Sample First: Always order a physical sample. View it in the actual lighting of your bathroom (both natural and artificial light).
Order Extra: Purchase 15-20% more tile than you need. This accounts for cutting waste, breakage during installation, and future repairs. Because it's a natural vein-matched product, you cannot buy a matching batch later.
Check Batch Numbers: Ensure all boxes are from the same production lot and batch number to avoid color or veining discrepancies.

2. Installation: The Make-or-Break Phase
Improper installation is the number one reason for marble failures. Your installer must be experienced with natural stone.
A. The Installer:
Do NOT hire a standard tile-setter. You need a stone mason or a highly experienced tile installer who specifically knows how to work with delicate, porous marble in wet environments. Ask for references and photos of previous marble projects.
B. The Key Installation Steps:
Substrate Preparation: The wall must be perfectly flat, clean, rigid, and dry. Any movement in the wall will cause the marble to crack. Cement backer board (e.g., Durock, HardieBacker) is mandatory for wet areas, not drywall.
Waterproofing: A critical step for any shower/bath area. A liquid or sheet membrane waterproofing system (e.g., Schluter KERDI, RedGard) must be applied over the backer board to protect the wall structure from moisture.
The Right Mortar: Use a white, non-staining, polymer-fortified thin-set mortar. Gray mortar can bleed through the light stone and discolor it.
Sealing BEFORE Grouting:
The marble must be sealed with an impregnating sealer (a penetrating sealer that doesn't change the look) after it is installed but BEFORE it is grouted. This prevents the grout from staining the porous surface during cleanup.
The installer may also recommend sealing the back of the tiles to prevent moisture from the mortar from causing "ghosting" or discoloration.
Grouting:
Use a non-sanded grout for most ledgestone applications, as the joints are typically very tight. Sanded grout can scratch the soft marble.
The grout color is crucial. Bright white will highlight the pattern, while a light gray or beige will be more forgiving and complement the veining. Avoid dark colors as they can create a stark, grid-like effect.
Cleanup must be meticulous and gentle with clean water and non-abrasive pads.

3. Maintenance: A Lifetime of Care
Marble is not "install and forget." It requires a consistent maintenance routine.
A. Sealing (Ongoing):
Impregnating sealers wear off. You will need to re-seal the marble periodically.
How to test: Sprinkle a few drops of water on the surface. If it darkens immediately and soaks in, it's time to re-seal. If it beads up, you're still protected.
In a high-use bathroom, this could be as often as every 6-12 months.
B. Daily Cleaning:
NEVER use acidic, abrasive, or vinegar-based cleaners. This includes most generic bathroom cleaners, Windex, and products containing lemon or ammonia. They will etch the surface, leaving dull spots.
Use only pH-neutral cleaners specifically formulated for natural stone.
Wipe up spills immediately, especially anything acidic (toothpaste, perfume, alcohol, citrus, soda, wine, coffee).
Use a soft cloth or a microfiber mop for cleaning. No abrasive scrubbers.
C. Dealing with Issues:
Etching: These are chemical burns that remove the polish. On a honed (matte) finish, etching is less noticeable. On a polished finish, it's very obvious. Fixing etching requires professional polishing with diamond abrasives-a difficult and messy job.
Staining: Blot spills immediately. For oil-based stains, a poultice made from a baking soda and acetone paste may be needed. For water marks, often just proper drying and re-sealing helps.